
Home » Docs
Zotly Product Documentation & Setup Guides
#Problems
Chat widget not displaying
The chat may not be showing due to the following reasons.
- You may not see the chat because you have disabled it in the settings area. To fix this, visit the settings section and deselect all options related to that: Chat > Manual initialization, Chat > Login initialization, Chat > Hide chat outside of office hours
Conversations are not visible to administrators or agents
The conversations may not be showing due to the following reasons.
- The agent has been given a department, yet the conversations have not been assigned to that specific department.
- One or more of the following settings have been activated: Miscellaneous > Routing, Miscellaneous > Queue, Miscellaneous > Hide conversations of other agents
- You are using the chatbot, and the human takeover feature is activated.
For cases 1 and 2, make sure to log in with the correct admin/agent or check your admin/agent profile to ensure that there are no departments assigned. In case 3, please check the archived conversations.
#Conversations
Manage conversations
Conversations have a total of four different statuses: mark as read, archive, delete, and restore. You can manage the status of a conversation by opening it in the conversations area and then clicking any of the corresponding icon buttons in the top right of the conversation window.
Search for conversations
You can search for conversations by department ID, assigned agent ID, conversation title, conversation ID, message text, message attachments name, user first name, user last name, and user email. If you search for a specific message text, the conversation containing that message will be shown at the correct position, and the message will be highlighted.
Information
- When you empty the trash, all the conversations in the trash are permanently deleted.
- When a user sends a new message to an archived or trashed conversation, the conversation is automatically restored and will now be visible in the Inbox area.
- Trashed conversations are deleted automatically after 30 days.
- When a user is deleted, all the conversations and messages are permanently deleted too.
- An agent can delete their messages by opening the message menu and clicking Delete. The message menu becomes visible when you hover the mouse cursor over the message.
- The left conversation list uses auto-pagination, which is limited to 100 results per scroll.
Reply to a message
- You can reply to a message by opening the message’s menu and clicking Reply to. The reply to feature is supported only on the following messaging services: WhatsApp, Telegram, and Facebook Messenger.
#Queue and routing
When the queue is activated via Settings > Miscellaneous > Queue, or routing is activated via Settings > Miscellaneous > Routing, Zotly automatically assigns the users conversations to all available agents proportionately.
- Only online agents are counted as “available” agents and will receive new conversations. Conversations are assigned proportionally between all online agents. If no agents are online, the conversation will remain unassigned and will be automatically assigned to the first agent who comes online.
- Admins are not included; admins always see all the conversations.
- Agents must archive a conversation to mark it as completed; this will automatically give them access to the next conversation in the queue. A conversation is active if it’s not deleted or archived.
- Agents can switch their status between online and offline by hovering over their profile image and then clicking the label of the profile pop-up at the bottom-left of the admin area.
- Agents can only search and filter their conversations.
- Agents can only view their conversations; however, they can see all of the conversations of a single user.
- To enable agents to view all unassigned conversations, activate Settings > Miscellaneous > Hide conversations of other agents and view unassigned conversations.
- Queue and routing are compatible with the departments.
- If human takeover is active, the queue or routing is activated only on human takeover.
- When the routing or queue is active, the agent’s menu will be automatically enabled.
More information – Queue only
When the queue is activated users enter a queue automatically when an agent’s chat limit is reached. When a user enters the queue, a message with the current position in the queue and the estimated waiting time is displayed. Zotly automatically assigns the conversations to all available agents proportionately. When an agent marks a conversation as completed (by archiving it), the queue is updated and a new conversation is received.
- If a user is in the queue and leaves (e.g. by closing the browser) for more than 1 minute, the conversation is saved; however, once the user comes back, the queue is reset and the user will lose their previous position. If the user leaves, the conversation remains unassigned and therefore invisible to agents, but only visible to admins.
- You can use the following merge fields in the queue message: {position}, {minutes}. They will be replaced by the real values in real-time.
- The waiting time is displayed in minutes and is calculated as follows: queue position X response time = waiting time. For example, if a user is 5th in the queue, and the response time has been set to 4 minutes (via Settings > Miscellaneous > Queue), then the total wait time displayed to the user will be 20 minutes.
- When the sound option is active, a sound is played when it’s the user’s turn.
- For conversations started from messaging apps like WhatsApp, it is not possible to respect the limit of conversations per agent, all conversations will be immediately and proportionally assigned to an online agent. If no agents are online, the conversation will remain unassigned and will be automatically assigned to the first agent who comes online.
- Use the offline message to prevent the chat from showing the queue update message to the user.
To test the queue, follow the steps below:
- To simulate multiple users and agents, open the chat in multiple different browsers (e.g., Opera, Firefox, Brave, Chrome, etc.). Each browser can simulate two users/agents: one in normal mode and one in “private” or “incognito” mode.
- To reset the chat and start a new user session, open the browser console, enter SBF.reset(), and press ENTER.
More information – Routing only
When the routing is activated Zotly automatically assigns the users conversations to all available agents proportionately.
- If the Routing > Disable online status check option is active, the conversations are distributed proportionally among all agents, regardless of whether they are online or offline.
- When an agent comes back online after being offline, all unassigned conversations are automatically assigned to them.
- When routing is active agents can manually route conversations to other agents from the right panel of the conversations area.
- If the conversation is archived and the user reopens it in the future by sending a new message, if the assigned agent in the conversation is offline, the conversation is assigned to another agent.
Manual routing
When the routing is activated via Settings > Miscellaneous > Hide conversation of other agents, agents see only their own conversations and can select the unassigned ones.
- Agents menu: enable the agents menu.
- Routing if offline: if the conversation is archived and the user reopens it in the future by sending a new message, if the assigned agent in the conversation is offline, the conversation is assigned to another online if there is at least one, otherwise to no agent.
- View unassigned conversations: allow agents to view the unassigned conversations, when an agent replies the conversation is automatically assigned to him and the conversation is removed in real-time from the admin area of the other agents. Check this option to enable the manual routing.
Agents menu
The Agents menu lets you assign conversations to specific agents. It appears on the right side of the conversations area and is automatically enabled when queueing or routing is active. Select multiple conversations to assign the selected conversations to a specific agent.
Assign an agent to a conversation
You can assign an agent to a conversation in several ways:
- Via the Q&A set data feature.
- Via the flows actions feature.
- Via the queue or routing features.
- By enabling the Settings > Chat > Agents menu option. In this case, the user will be required to select an agent before starting a new conversation.
- Via Settings > Automations > More.
- Via JavaScript, with the variable var SB_DEFAULT_AGENT = ID;. Enter the code into the pages where the chat is displayed and replace ID with the agent ID.
#Rich messages
Rich messages are special messages with interactive features like buttons, dropdowns, or inputs. They allow an agent to request information from the user via a user input form or to display interactive content. Rich messages can be inserted into a chat message using shortcodes. Shortcodes accept various parameters like title and description. The available rich messages are listed below.
How it works:
Create and send
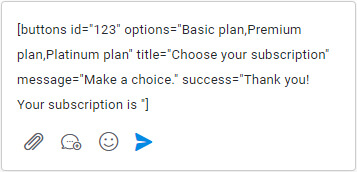
Create a rich message by inserting the shortcode into the text editor of the admin area. Customize all of the parameters with your information and send your message.
Message is displayed
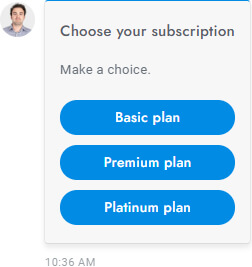
When a shortcode is used, the user sees the rich message (not the shortcode) and can select or enter the required information to complete the form submission.
User’s response is submitted
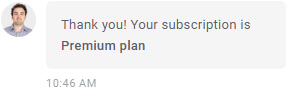
Once the rich message form has been filled out and sent by the user, a success message is shown and the form data is saved.
Rich Messages
| Name | Shortcode | Description |
|---|---|---|
| Card | [card image="URL" header="TITLE" description="Lorem ipsum dolor sit amete" link="URL" link-text="Purchase" extra="$599" target="_blank"] | Call-to-action card with an image, title, description, link, and more. |
| Slider | [slider image-1="URL" header-1="TITLE" description-1="Lorem ipsum dolor sit amete" link-1="URL" link-text-1="Purchase" extra-1="$599" image-2="URL" header-2="TITLE" description-2="Lorem ipsum dolor sit amete" link-2="URL" link-text-2="Purchase" extra-2="$599" target="_blank"] | Slider of call-to-action cards with an image, title, description, link, and more. You can add up to 10 slides. |
| Slider images | [slider-images images="URL,URL,URL"] | Slider of images. |
| Chips | [chips options="A,B,C"] | List of buttons. |
| Buttons | [buttons options="A,B,C"] | List of buttons. |
| Select | [select options="A,B,C"] | Dropdown list of options. |
| Inputs | [inputs values="A,B,C" button="Send now"] | List of text inputs. |
[email name="true" last-name="true" phone="true" phone-required="false" placeholder=""] | Form to collect the user’s email and phone number. All attributes are optional. Follow up settings used as default values. Add the attribute required-messaging-apps=”true” to force users to provide their email and phone on messaging apps. Merge fields are supported. | |
| Timetable | [timetable] | Timetable. |
| Articles | [articles link="https://zotly.com/articles-demo"] | Articles with search area. The link attribute is used as fallback message for Facebook Messenger, WhatsApp, Telegram messages. |
| List | [list values="A,B,- C,- D,E" numeric="true"] | Text list. Prefix an item with the – char to make it an inner item. |
| List double | [list values="A:X,B:Y,C:Z"] | Text list with titles. |
| List image | [list-image values="URL:A,URL:B,URL:C"] | Text list with titles and images. |
| Table | [table header="A,B,C" values="A:B:C,A:B:C,A:B:C"] | Table. |
| Button | [button link="https://zotly.com" name="Click here" target="_blank" style="link"] | Display a link or open an article. The attribute target=”_blank” is optional and open the link in a new window. The attribute style=”link” is optional and change the button design. To open an article on click the link value must be #article-ID, replace ID with the article ID. |
| Video | Display a YouTube or Vimeo video. The value of the attribute type can be youtube or vimeo. The attribute id is the ID of the video, get it from the URL. The attribute height is optional and sets the video height in px. | |
| Image | [image url="https://domain.com/admin.png"] | Image. |
| Share | [share fb="https://zotly.com/" tw="https://zotly.com/" li="https://zotly.com/" pi="https://zotly.com/" wa="https://zotly.com/"] | Social share buttons. |
Global parameters
All of the rich messages support the following parameters:
| Parameters | Description |
|---|---|
id="123" | The ID of the rich message (used also to save the JSON data). |
title="ABC" | The rich message title. |
message="ABC" | The rich message description that appears underneath the title. |
success="ABC" | The message that appears when the user completes and sends the rich message. The user input is appended to this message. |
settings="ABC" | Extra field for optional extra values. |
Show a rich message on chat initialization
To display a rich message, such as a list of buttons, when a user initiates a chat for the first time, insert the rich message shortcode into the welcome message.
Custom rich messages
To display a rich message, such as a list of buttons, when a user initiates a chat for the first time, insert the rich message shortcode into the welcome message.
HTML codes
When creating a custom rich message, you can use the following codes:
| Code | Description |
|---|---|
<a href="https://www.google.com" target="_blank" class="sb-rich-btn sb-btn">Click here</a> | Link with button design. |
<a href="https://www.google.com" target="_blank" class="sb-rich-btn sb-btn-text">Click here</a> | Link. |
<div class="sb-image"><img src="https://via.placeholder.com/1500x600" class="sb-image" /></div> | Image that zoom on click. |
#Built-in messages
The built-in messages are pre-programmed messages sent automatically by Zotly AI. You can find them by going to Settings > Messages.
Welcome message
Send a message to new users when they visit the website for the first time.
- Text formatting is supported.
- Merge fields are supported.
- Rich messages are supported.
- Conversations containing only the welcome message (and no response) are automatically archived.
Follow up message
If no agents respond within the specified time interval, a message will be sent to request the user’s details, such as their email.
- Text formatting is supported.
- Merge fields are supported.
- You can send a confirmation email to the user by filling in the Follow-up Email fields.
- If the delay is not set, a dynamic time interval is utilized, and it is determined as follows: If Settings > Miscellaneous > Office hours is configured, and the current time falls within the defined office hours, or if at least one agent is online, then the delay will be set to 15 seconds. In all other cases, the delay will be set to 5 seconds.
- Follow-up messages are sent a maximum of once every 24 hours.
- If the user provides an email address and the newsletter feature is enabled, the email address will be subscribed.
- The follow-up message is sent only to users without an email address.
- If the chatbot’s human takeover feature is activated, the follow-up message is only sent during human takeover.
Offline message
Notify the user when their message is sent outside of the scheduled office hours or all agents are offline.
- Text formatting is supported.
- Merge fields are supported.
- To learn more about the office hours option, please click here.
- The offline message is sent to the same user a maximum 1 time per hour.
- By default, the offline message is also sent if all agents are offline, even during office hours. To prevent this, enable the Disable agents check option.
- If the chatbot’s human takeover feature is activated, the offline message is only sent during human takeover.
Privacy message
Present a privacy message accompanied by Accept and Decline buttons. The user’s approval by clicking on the Accept button is required to start using the chat. This feature ensures privacy policy enforcement and GDPR compliance.
- The privacy message is not shown if the Settings > Users > Require registration option is enabled.
- The privacy message is also sent to messaging channels like WhatsApp, but the user does not have the option to approve or decline the privacy policy. The messaging functionalities are not blocked either. The message is sent after the user initiates the conversation by sending their first message.
Pop-up message
Show a pop-up notification to all users.
- The pop-up message is always shown until the user manually closes it; then it stays closed.
Notes
Notes allow agents and admins to add comments to conversations.
- Notes are only visible to agents and admins.
- Manage the note settings from Settings > Admin > Notes settings.
- You can disable the tags from Settings > Admin > Disable features > Notes.
Transcript
The full conversation can be sent to the user by the agent or admin as a transcript file.
- Agents and admins can send conversation transcripts to users by clicking the Transcript button in the top-right corner of the admin’s conversation window.
- Agents and admins can automatically send the transcript to the user when the conversation is archived by using the close message available at Settings > Messages & Forms > Close message.
- The transcript can be sent to the user only if the user has an email address.
- If the conversation has been translated, the transcript will also include the translated messages.
Miscellaneous
The date and time format is automatically detected based on the browser’s language settings.
#Users
Manage users
Manage users from the Users area in the left menu of the admin area.
Import users
You can import users from Settings > Users > Import users. Only CSV files are supported. You can download an example CSV file here. In the example file, the first row is the header and the columns Height and Hair color are custom user fields added from Settings > Users > Custom fields.
Delete users
You can delete a user by opening the User edit box and then clicking Delete user. To delete multiple users at once, select the users you want to delete from the Users table and then click the top right Delete icon.
- When a user is deleted, all of their conversations and messages are automatically deleted permanently.
- The conversation attachments will be deleted permanently. If AWS S3 is enabled, also the AWS S3 files will be deleted.
- If a user of a deleted user come back to the website, a new user is automatically created.
- Visitors are automatically deleted every 24 hours.
Merge users
You can merge two users into one directly from the user table. Select any two users, then click the Merge Users button at the top.
- When two users are merged, all their conversations are combined under the new user account.
- The system automatically identifies and merges relevant information from both users into the new account.
User types
| Type | Description |
|---|---|
user | A “user” is any user with an email. |
lead | A “lead” is any user with no user details, who is automatically registered, and with at least one conversation. |
visitor | A “visitor” is any user who has not started a conversation. Note: Visitors are automatically deleted every 24 hours. |
#Manage agents and admins
Manage, create, and delete agents and admins from the Users area.
- Configure agents’ privileges and permissions from Settings > Admin > Agent privileges.
- It can create a supervisor from Settings > Admin > Supervisor. The Supervisor is a special agent with specific privileges, it must be an administrator. You can add multiple supervisors by adding comma separated admin IDs.
- To create an agent or ad admin, go to the users area and click the button Add user on the top right.
- Only agents and admins can log in the Zotly admin area.
Collect user details
You can gather user details, such as their name and email, through various methods:
- With a pre-chat form using the registration form.
- With the Follow-up message.
- With the chatbot flows.
Registration
The registration form is a pre-chat form that requires the user to enter specific information before starting the chat. Use it to require users to provide certain information, such as their name and email, before starting a chat. You can configure the registration form in Settings > Users.
Information
- You can use the registration form as a pre-chat form by limiting the information requested from the user to only the user’s email address or the user’s name, for example. To do that, set the Require registration option to Registration form and enable the required user fields under the Registration fields list.
- The log-in form is shown only if the email field is enabled.
- You can automatically log in a user via URL parameters.
- If a user tries to register with an email that’s already registered, an OTP will be sent to allow them to log in. Keep in mind that in real-world use, duplicate registrations rarely occur since users remain logged in on the same device; it usually happens only during testing.
OTP
The OTP feature verifies a user’s email during registration by sending a one-time code to their email address. The user must enter this code in the registration form. Enable it from Settings > Users > Email verification, and customize the OTP email from Settings > Users > Email verification email. Note that the OTP is always sent — even if the feature is disabled — when a user tries to register with an email that’s already registered.
Login link and forgot password
If a user forgets their password, they can click on the Forgot password button and an email containing a login link will be sent to their registered email address. Once the user clicks the link, they will be logged in automatically. You can customize the email sent to users from Settings > Users > Login link email. This feature is available only if Require registration is set to Registration and login form or Login form.
Miscellaneous
- New users are automatically displayed in the user table in real time.
- To view online users enable Settings > Users > Register all visitors.
- Agents and admins can set their status to online or offline from the bottom-left profile panel. If the option Settings > Notifications > Away mode is active, the offline status is activated automatically when the agent or admin has been inactive in the admin area for at least 10 minutes. Inactivity is defined as not performing any mouse clicks, movements, or key presses.
- The users table use auto-pagination, which is limited to 100 results per scroll.
#Settings
Office hours
You can set the office hours timetable from Settings > Miscellaneous > Office hours. Office hours are used for:
- Sending the offline message.
- Disabling and hiding the chat during out-of-office hours.
- Disabling the chatbot during regular office hours and enabling it during out-of-office hours.
More information
- If a day has only one start and end time, enter them in the first two fields. For example, use 10:00 AM to 5:00 PM and (empty) to (empty), not 10:00 AM to (empty) and (empty) to 5:00 PM.
- Do not leave empty values. Set them to closed instead.
- You have to set values to closed if you want to set a whole day as not office hours.
- The office hours are in UTC format. Set your UTC from Settings > Miscellaneous > Timezone.
- The date and time format of the timetable matchs automatically the one used in the country of the browser language of the user.
Articles
Knowledge base articles provide instant answers to customers to help reduce customer support volume. You can access the articles from the left Zotly menu.
How to display the articles area
- The articles can be shown in the chat dashboard by enabling them from Settings > Articles > Display in dashboard.
- Alternatively, articles can be shared in any chat conversation via the rich message shortcode, [articles].
One-page navigation
The article’s one-page navigation appears automatically on all articles. It is generated from the article’s h2 and h3 heading blocks.
Change articles with the name of your articles page and set the articles page URL in Settings > Articles > Articles page URL.
Language
- You can add new article translations by opening an article. Click the + icon on top right and select the language you want to translate the article into. To delete a translation, hover the language flag icon and click the trash icon.
- You can add new category translations by opening a category. Click the + icon on top right and select the language you want to translate the category into. To delete a translation, hover the language flag icon and click the trash icon.
- You can enable automatic translation of articles and categories by activating both the multilingual via translation feature and Settings > Articles > Language > Automatic translation. You also have to set the default language of your articles from Settings > Articles > Language > Default language. The language used for the automatic translation is the user’s language detected by Zotly ai. You can also force a specific language by adding the URL parameter lang=LANGUAGE-CODE.
- The language menu is shown at the bottom of the article. It shows all the available translations of the article.
- If there is at least one translated article in the user’s language, only the translated articles are displayed in the category page or main page. Otherwise, all articles are displayed in the original language.
- Force the articles page to be shown in a specific language by adding the URL parameter lang=LANGUAGE-CODE. Replace LANGUAGE-CODE with the two-letters language code.
Chat language
Zotly comes with 45+ languages. There are many options available to set the language:
- OPTION 1 Go to Settings > Chat and check the Language option. Set it to multilingual to automatically use the chat language of the user’s browser or the language saved in the user profile.
- OPTION 2 Add the URL parameter lang=LANGUAGE-CODE to the script that loads the chat, replacing “LANGUAGE-CODE” with the two-letters language code you would like to display. E.g. https://app.zotly.ai/account/js/init.js?id=123456&lang=es
This feature will force the chat to always use the same language and the Settings > Chat > Language option will be ignored. Go to wikipedia.org/wiki/List_of_ISO_639-1_codes for the complete languages code list (see column 639-1). For Traditional Chinese use zt, for Simplified Chinese use zh, for Brazilian Portuguese use pt.
Admin language
To translate the admin area follow the steps below:
- Translate the texts in your language from the Settings > Translations.
To set the admin area language you have three options:
- Activate the option Settings > Admin > Automatically translate admin area. This feature automatically translate the admin area to match the agent profile language or the agent browser language.
#Departments
Departments give you the power to distribute conversations and assign various agents to specific departments. For example, you can create a department entitled “Sales” and assign specific conversations to that department. To start using departments, follow the steps below:
- Go to Settings > Miscellaneous and add, delete and manage the departments. After saving, reload the page.
- Go to Users > Agents and edit an agent, you will see a new field where you can set the department of the agent.
- Reload the page and you’re done! In the Conversations area, you will now see an option to set the department.
Settings
- Display in dashboard Displays the departments’ list in the chat dashboard and force users to choose a department before starting a conversation.
- Display images Displays the department image instead of the department color.
- Display in conversation list Displays the department color in the conversation list of the admin area.
- One conversation per department Restrict users from opening multiple conversations within the same department, allowing only one conversation to be active per department.
- Label Replace the label Departments (plural) with another text. The name is displayed in the admin and tickets area.
- Label single Replace the label Department (singular) with another text. The name is displayed in the admin and tickets area.
- Dashboard title Set the title of the chat dashboard list. Default: Departments.
How it works
- Agents and admins with no assigned department always see the conversations of all departments.
- Agents and admins with an assigned department can only access conversations, users, and agents within that department.
- When a conversation is assigned to a new department, an email notification is sent to all of the agents assigned to the new department.
- The chatbot can assign a department to the active conversation through the Q&A set data feature, the flows actions feature.
How to assign a department to a conversation
You can assign a department to a conversation in several ways:
- Via the Q&A set data feature.
- Via the flows actions feature.
- Via Settings > Miscellaneous > Departments settings > Display in dashboard. In this case, the user will be required to select a department before starting a new conversation.
- Via Settings > Automations > More.
#Q&A
The information below is related to the Question and Answers section of the chatbot training area. Add questions and answers to the chatbot to improve its performance. The chatbot will use this information to respond to user inquiries.
Question
Enter the user messages that will trigger the answer. Add as many question variations as necessary. For example the questions to the answer I’m a chatbot! could be Who are you?, What are you?, Are you a bot?.
Answer
Enter the text that will be used to answer the user question.
Tools calling
For more details read the Tools calling section below.
Set data and actions
Set the specified user values when the question is asked. You will see such values in the user details panel. You can use the following merge fields to assign values extracted from the user messages. Include these fields in the answer and they will be replaced with the actual values: {language}. You can also use this feature to perform actions like assigning departments, agents, and tags to the conversation.
#Flows
The information below is related to the chatbot flows area. Flows allows you to easily create conversation flows powered by our chatbot. Use them to guide the user toward a specific goal with a series of pre-defined messages.
Flow blocks
- Start: Use the start block to set when the flows should start. It can be everytime the user start a new conversation, when it sends a specific message, or on page load. If you set conditions, the flow will only start when all conditions are met. If you set a department, the flow will only start for conversations assigned to that department. If you set a source, the flow will only start for conversations from that source.
- Send message: Send a message to the user.
- Send choices: Send a list of buttons to the user or allow to choose one. When conversational mode is enabled, buttons are hidden, the chatbot sends only text, and users select options by replying with text. Zotly AI interprets the message and selects the corresponding option, continuing the flow as if the button were pressed. This creates a more natural, chat-like experience and is automatically activated, only when needed, on messaging channels such as WhatsApp and Instagram. If the user’s reply doesn’t match any option, a fallback message with the available choices will be sent. You can add variations to the button texts by separating them with the | char, for example: Yes|Yeah|Sure. They will help the AI to understand the user reply.
- Send video: Send a video to the user.
- Get user details: Get the user details and store them in Zotly. You will see such values in the user details panel. You can leave the description field empty for default details, but it’s required if using custom user fields. Note that user details will not be saved if you test this flow in the playground, as the user there is temporary. To see details saved, test the flow with a real user.
- Set data: Set the specified user values when the block is executed. You will see such values in the user details panel.
- Actions: Execute the specified actions when the block is executed.
- Conditions: Use it to create different branches in the flow. If the conditions are met, the flow will follow the branch set as true, otherwise the one set as false.
- Rest API: Use it to send data to your server. The body must be a JSON array. Details like user ID and conversation ID are automatically included in the data sent to your server under the sb key. Use the save response section to save specified user details with values from your server response. Use the JSON dot notation. Our support doesn’t include assistance with this feature, you would need a developer’s assistance on your end.
- Tools calling: For more details read the Tools calling section below.
- Flow connector: Connect the flow to another flow and start it.
Information
- Flows can be multilingual. Add translations for messages, button texts, and other content in the translations area. You can also use the multilingual via translation feature for automatic translations. If the default language of your flows is not English you have also to set the default language under Settings > Artificial Intelligence > OpenAI > Training Sources Language.
- Users can move back to earlier steps and update previously entered details in a conversational manner. For example, they might say “Sorry, I entered the wrong email”, “I need to update my email and phone number”, or even a general message like “Sorry, I entered the wrong details, go back”, which will return them to the previous step.
Tools calling
Tools calling allows to connect the chatbot to external tools and systems to retrive information needed to answer the user. The chatbot will query your server and return the information from your server to the user. The data sent to your server is in the body and it includes the user input, user ID, and conversation ID. Tools calling is used by Q&A and Flows. Our support doesn’t include assistance with this feature, you would need a developer’s assistance on your end.
Parameters
- URL: Enter the URL of the API endpoint that will supply the necessary values for the function.
- Headers: If you are setting up a Q&A, enter key-value header parameters, separated by commas. E.g. apikey:123345, json:true. If you are setting up a flow, enter add key-value header parameters by clicking the Add new item button.
- Properties: Enter values that the user must provide to the chatbot. For example a city, a tracking number, etc. The chatbot will ask the user for these values. If you already know all the possible values, you can enter them in the Allowed values field.
Data sent to your server
Zotly will send the following information to your server. If you use the POST method, it will be included in the JSON body, if you use the GET method, it will be included in the header.
{
    "sb": {
        "user_id": "123",
        "conversation_id": "123",
        "user_language": "es"
    },
    "arguments": {}
}
The arguments array contains the values provided by the user. The keys are the name converted to kebab case, for example if the property name is Order Number, the key will be order-number. The user_id is the ID of the user in Zotly and conversation_id is the ID of the conversation. You can use these IDs to retrieve more information about the user and the conversation via the REST API.
Response from your server
Your server must returns a JSON array with the values required by the chatbot. Include success: true only when the request is successful and the expected information is returned. Do not include it if the information cannot be retrieved (e.g., when an invalid order number is provided). See the example below for more details.
{
    "order_status": "Delivered 2 hours and 25 minutes ago",
    "success": true
}
#Tickets
The settings below are related to the Tickets app. The Tickets app allows users to create conversations and send messages via a UI different from the chat.
Installation
- To display the tickets area include the chat embed code into your page and add the attribute &mode=tickets to the script URL, e.g. <script id=”chat-init” src=”https://app.zotly.ai/account/js/init.js?id=65895623&mode=tickets”></script>. You can show the tickets area also by inserting the code <script>SB_TICKETS = true;</script> into any page showing the chat.
Information
- If the tickets area is not visible, make sure to uncheck the option Tickets > Manual initialization.
- You can also use the tickets area to display an inline or full-width chat panel.
- Tickets are the same of chat conversations on the admin-side, the only difference from chat conversations is the front-end UI.
- Most of the settings of the chat are compatible with the Tickets App but not all of them. The dashboard settings, the pop-up message, and more are not compatible.
- Dedicated APIs for the Tickets App are available in the API section.
- To remove the mandatory ‘New ticket’ form for new users, activate the welcome message of Settings > Messages & Forms > Welcome message. The welcome message delay is ignored in the tickets area, the message is sent immediately..
- To manually disable the mandatory registration only on a single page use the JavaScript code var SB_REGISTRATION_REQUIRED = true. Set it to true to force the registration instead.
- The tickets area is compatible with Google reCaptcha v3.
The settings below are related to the WhatsApp app.
Installation
From Settings > Apps, click WhatsApp, then click Active.
WhatsApp Cloud API Setup – Automatic sync mode
- Click Synchronize now and complete the procedure.
- To add new numbers, visit https://business.facebook.com/wa/manage/phone-numbers/. If you add new numbers after the sync process, you will need to sync them again. All numbers will be automatically synchronized. If you wish to disable specific numbers, you can delete them from Settings > WhatsApp > Cloud API numbers.
- If you sync again with the same phone number and do not receive the verification SMS or call, you can enter the latest PIN you received and it will work.
If you do not receive the messages sent to your WhatsApp number in Zotly dashboard, please check the following:
- Click Reconnect and complete the procedure.
- Go to the Meta Business Suite and add a payment method.
WhatsApp Cloud API Setup – Manual sync mode
- Create a new account at https://developers.facebook.com or login with your existing account.
- Create a new app and choose Other as the app type. Then select Business. Enter a name for the app and select the Business Account used for WhatsApp.
- Go to Settings > WhatsApp > Cloud API settings > Secret key enter a random string then go to https://developers.facebook.com/apps and select your app. Click Add product and add WhatsApp, then go to WhatsApp > Configuration and in Webhook URL enter the URL you get from Settings > WhatsApp > Cloud API > Configuration URL. In Verify token enter the secret key you previously entered in Zotly. Click Verify and save, click Webhook fields > Manage, enable the following Webhook fields: messages.
- To verify the integration, simply go to https://developers.facebook.com and select your app. From there, click on “WhatsApp” in the left menu and then select “API Setup”. Copy the Phone number ID and paste it into Settings > WhatsApp > Cloud API numbers > Phone number ID. Enter the desired phone number in the “To” field, such as your personal WhatsApp number, and send a test message. Check your WhatsApp account and send a reply, which should then appear in Zotly dashboard. To reply to the test number from Zotly, copy the “Temporary access token” and paste it in Settings > WhatsApp > Cloud API numbers > Token.
- To activate the WhatsApp integration for all phone numbers and add a live phone number, refer to the following guidelines.
Go to Settings > WhatsApp > Cloud API numbers > Token enter the permanent access token, follow the instructions below for getting it.- Visit https://business.facebook.com and go to Left menu > Settings > Business settings, then go to Users > System Users to view your admin system user, or create a new one. Open the user and click Add Assets, then select the app used for the WhatsApp API integration and check Develop App, or Full control. The system user needs to be an admin. If you do not see the option, click Business settings.
- Click Left menu > Account > Apps. Select your app or add it. Make sure the system user is there and has full control. If not, click Add user, select the system user, click Full control, and click Assign.
- Click Left menu > Apps and under Select Assets choose your app, assign Full control and save.
- From Left menu > WhatsApp accounts select the WhatsApp account linked to your appp, then click Assign people and select the System user, grant to it Full control.
- From Users > System Users select the user you just created and click Generate New Token, click Apps and select the app used for the WhatsApp API integration, set the Token expiration to Never, enable the following permissions: whatsapp_business_management, whatsapp_business_messaging, business_management. Click Generate Token and save. Paste the token in Settings > WhatsApp > Cloud API numbers > Token.
- To add additional phone numbers, go to https://developers.facebook.com, select your app, and click Left menu > WhatsApp > API Setup. To get started, click on Add phone number at the bottom and follow the instructions provided.
- After activating the number, copy the Phone number ID and paste it into Settings > WhatsApp > Cloud API numbers > Phone number ID.
- If the number is in pending status, you need to enter your app dashboard and then from Left menu > WhatsApp > API Setup click Generate access token.
- Please keep in mind that if you use your current WhatsApp business number in Zotly, it will no longer be usable with your WhatsApp Business app, and you will need to migrate it following these instructions.
360dialog Account Setup
- Go to https://www.360dialog.com/ and create a new account.
- Enter your dashboard and from Left menu > WhatsApp Accounts generate the API key and copy and paste it in Settings > WhatsApp > 360dialog settings.
- Click Settings > WhatsApp > 360dialog settings > Synchronize now.
- Done! Zotly should start receiving the WhatsApp messages sent to your number, and you can reply to those messages from your Zotly dashboard.
- Note that you can also use the free sandbox account for testing, more details at https://docs.360dialog.com/ whatsapp-api/whatsapp-api/sandbox. The sandbox account has limitations and some features, such as media attachments, will not work.
Twilio Account Setup
- Go to https://www.twilio.com and create a new account.
- Verify your phone number.
- Complete the form and choose WhatsApp, Alerts & Notifications, With no code at all, 3rd party integrations.
- From the Twilio console copy ACCOUNT SID and AUTH TOKEN and paste them into Zotly > Settings > WhatsApp > Twilio settings, save the changes.
- You will now set up a free test account to run some tests and make sure the integration works with Zotly. From the left menu click Messaging > Settings > WhatsApp sandbox settings and enter into WHEN A MESSAGE COMES IN and STATUS CALLBACK URL the URL of Zotly , get it from Zotly > Settings > WhatsApp > Twilio settings > Get configuration URL. Mind that localhost will not work, you need a public URL and a live server.
- From the left menu click Messaging > Try it out > Send a WhatsApp message. Follow the instructions and send the message with the code to the WhatApp number provided. Click the next buttons until the configuration is complete.
- Done! Zotly should start receiving the WhatsApp messages sent to the sandbox account, and you can reply to those messages from the Zotly.
- To publicly use the WhatsApp integration with your customers you need also to complete the steps below:
- Update your account and enable billing, you can do that here.
- Purchase a Twilio number, which will be the phone number of your official WhatsApp Business account. More details here. You cannot use the phone number of your existing WhatsApp Business account, you must use a Twilio number. More details here.
- From the Twilio console go to Messaging > Services and create a new Messaging Service. Click Add Senders, select WhatsApp Number as the sender type, and add the Twilio number you purchased. Copy the Service SID and paste it into Zotly > Settings > WhatsApp > Twilio settings > Sender.
#Templates
As for WhatsApp Business Policy, you cannot send outbound marketing and solicitation messages to end users. End user users must reach out to you first. You have 24 hours from when the end user’s message was sent from WhatsApp to reply to the message. To communicate with a user who has not contacted you before or has not been in touch for more than 24 hours, you must opt for the text message fallback or the WhatsApp message template.
- To send message templates you have to add a payment method to your WhatsApp Business Account. You can do it from https://business.facebook. com/billing_hub/.
- To send a specific message template to a group of users, use the direct messages feature.
Text message fallback
- To enable the text message fallback you must set up the SMS in Settings > Notifications > Text message notifications.
#WhatsApp flows
For more details about the WhatsApp Flows click here.
Built-in flows
Zotly automatically generates and sends the following flow. To regenerate a flow, click the Settings > WhatsApp > Clear flows button.
- Registration – This flow is sent when a new user sends their first message to the WhatsApp number, and the Settings > Users > Require registration option is enabled.
- Follow-up – This flow is sent if the Settings > Messages & Forms > Follow-up message option is active and the user does not have an email address.
Send custom flows
To send custom flows use the merge field {wa_flow id=”123″ header=”” body=”” button=””}. Replace 123 with the flow ID and enter a text for the attributes header, body, and button.
#WhatsApp shop
To displays the products of your shop use the merge fields below.
| Merge field | Description |
|---|---|
| {catalog id=”123″ product_id=”123″ body=”” footer=””} | Display a single product. Replace id with the catalog ID and product_id with a product ID. The attributes body and footer are optional. |
| {catalog id=”123″ product_id_1_1=”123″ product_id_1_2=”123″ product_id_2_1=”123″ section_1=”” section_2=”” header=”” body=”” footer=””} | Display multiple products. Replace id with the catalog ID. Add products by grouping them into sections, via the attributes product_id_[A]_[B], replace [A] with the section index, starting from 1, replace [B] with the product index, starting from 1 for each section. You must also add the attribute section_[A]=”” for each section, replace [A] with the section index. The attributes header and body are required, footer is optional. |
When the user sends the order, the order information is sent to the URL specified in Settings > WhatsApp > Order webhook. The page at that URL should process the order and send a message to the user via the PHP API function sb_whatsapp_send_messa ge()
More information
- You cannot send a WhatsApp message to a user who has sent you a message more than 24 hours ago or has never messaged you before. WhatsApp prohibits this action. Instead, you must use a WhatsApp template or send an text message. If you encounter an “Error message: Re-engagement,” it indicates this situation.
- If you does not receive WhatsApp messages make sure you are not assigning the WhatsApp conversations to a department and that the WhatsApp number used for testing is not a phone number of a Zotly admin or agent.
- If you can not send messages, an error should appear in the admin area when you try to send a message to the user.
- We cannot provide support for Twilio or 360dialog configuration, including all related issues.
- We cannot provide support in getting your WhatsApp account or WhatsApp message template approved.
- WhatsApp conversations and messages are compatible with queue and routing.
- If you are testing with the sandbox and after 72 hours you can no longer send messages to your phone number you must link again your phone number to your sandbox.
- You can send rich messages to WhatsApp. If you send chips, buttons or select rich messages, with more than 3 options, you can use the whatsapp=”Your menu text” shortcode attribute to set the text of the WhatsApp message menu.
- The follow-up message is supported, but the message is always sent, also if an agent replies.
- The offline message is supported, but the timetable is not sent.
- The chatbot is supported. The human takeover feature is also supported. To enable the Dialogflow chatbot support for audio messages, activate Settings > Artificial Intelligence > OpenAI > Speech recognition
- The supported AI features include language detetction, spelling correction, multilingual via translation, Google search.
- Twilio and 360dialog has many limitations. For example, Twilio does not support messages longer than 1600 characters. We strongly recommend to use the Official WhatsApp API.
#Messenger
The settings below are related to the Facebook Messenger app.
Installation
From Settings > Apps, click Messenger and click Active.
Automatic sync mode
- Complete the synchronization by choosing at least 1 Facebook page and enter the returned information in Settings > Messenger > Facebook pages.
- You’re done. All messages sent to the Facebook pages and Instagram accounts you selected will appear in the conversation admin area of Zotly. Mind that only new messages will be synchronized, the old ones will not be imported.
Manual sync mode
- Create a new account at https://developers.facebook.com/ or login with your existing account.
- Create a new app and choose Other as the app type. Then select Business. Enter a name for the app and skip selecting any Business portfolios.
- From the menu on the left side, click on Add product. Choose Messenger.
- Under the Configure webhooks section, click on Configure.
- Retrieve the Callback URL from Settings > Messenger > Messenger and Instagram settings > Get configuration URL.
- Set the Verification Token in Settings > Messenger > Messenger and Instagram settings > Secret key and save the changes, then use it to verify the webhook.
- In Webhook Fields select the following: inbox_labels, message_deliveries, message_echoes, message_reactions, message_reads, messages, messaging_account_linking, messaging_handovers, messaging_optins, messaging_policy_enforcement, messaging_postbacks, messaging_referrals.
- In the Generate access tokens section, click on Connect. Select the pages you want to sync and complete the process.
- Under the Webhook Subscription column, click on Add Subscriptions. Choose the scopes you want: messages, messaging_postbacks, messaging_optins, message_reads, and message_echoes.
- In the Tokens column, click on Generate. Copy the access token provided and paste it into Settings > Messenger > Facebook pages.
- Copy the Page ID and Page Name and paste them into Settings > Messenger > Facebook pages.
- Repeat these steps for all pages.
- Save the changes and you’re done. The final step is to put the app in Live mode.
- If you want to sync Instagram as well, follow these steps:
- From the menu on the left side, click Messenger > Instagram settings.
- In the Configure webhooks area, click on Configure. Repeat the same step you previously took for Messenger.
- Under the Webhook Subscription area, click on Add Subscriptions. Select the following scopes: messages, messaging_postbacks, messaging_optins, messaging_seen.
- Enter your Instagram ID in Settings > Messenger > Facebook pages > Instagram ID. To get it, open your web browser and enter the following URL: https://graph.facebook.com/FACEBOOK-PAGE-ID/?access_token=ACCESS-TOKEN&fields=instagram_business_account. Replace FACEBOOK-PAGE-ID and ACCESS-TOKEN with the corresponding Page ID and access token from the Facebook page linked to Instagram.
- Save the changes and you’re done. The final step is to put the app in Live mode.
- Your app must be in Live mode. To do that, your app must be submitted for review and approved by Meta. Please note that help with this is not included in our Zotly support.
To link Instagram to your Facebook page and Zotly follow the steps below.
- Enter the Settings area of your Facebook Page and click Left Menu > Instagram (https://www.facebook.com/YOUR-PAGE-SLUG/settings/).
- Click Connect account and complete the setup.
- Sync Messenger with Zotly again and you’re done. Mind that only new messages will be synchronized, the old ones will not be imported.
Information
- If you don’t receive Instagram messages:
- Make sure to enable Zotly > Settings > Privacy > Messages & Forms > Connected tools – Allow access from your Instagram mobile app.
- Make sure your Instagram account is not setup as a professional account, it must be a business account.
- Go to Meta Business Suite, select your account, and go to Users > People. Under Instagram account click Manage and make sure to enable all the permissions.
- If you don’t receive Facebook Messenger messages, make sure that the Facebook page does not send automated replies, such as the welcome message.
- The Unsubscribe button remove the webhook subscription from all of your Facebook pages, it is useful if you want to stop receiving messages from a Facebook page.
- Every Zotly user has only 1 Facebook conversation and 1 Instagram conversation.
- Zotly rich messages are automatically converted to Facebook rich messages when possible, some part of the rich message could be removed or changed. Buttons, chips, and selects support a maximum of three choices and are only supported in the Instagram mobile app.
- Only private Facebook messages will get sent to your team inbox. If someone posts a Facebook message on your wall it won’t appear in your team inbox.
- When someone sends a message to your company Facebook page or Instagram account they will get designated as a lead in Zotly dashboard. You’ll only be able to see the user’s Facebook or Instagram name and profile picture.
- Messenger conversations and messages are compatible with queue and routing in Zotly.
- The chatbot is supported. The human takeover feature is also supported.
- The supported AI features include language detetction, spelling correction, multilingual via translation, Google search.
- If the chatbot is enabled, it is necessary to deactivate any automatic replies on Facebook Messenger, such as the welcome message.
- The follow-up message is supported, but the message is always sent, also if an agent replies.
- The offline message is supported, but the timetable is not sent.
- Only 1 Facebook account can be synchronized, to link pages from multiple Facebook accounts, the account synchronized in Zotly must be an admin of all Facebook pages of the other Facebook accounts.
- Using this integration of Instagram and Facebook Messenger comes at no additional cost.
- If the message exceeds 1000 characters, only the initial 1000 characters will be transmitted due to the character limit.
- Only new messages, sent after the synchronization, will be synchronized, the old ones will not be imported.
- User Data Deletion Request: To delete all of your data from Zotly, click Settings > Messenger > Unsubscribe then delete your account.
The settings below are related to the Twitter app.
Installation
- Register at https://developer.twitter.com. Make sure to verify your phone at https://twitter.com/settings/ phone or the registration will fail.
- Create your first app by entering the app name and click Get keys, copy API Key (Consumer key) and API Key Secret (Consumer secret) and paste them in Zotly > Settings > Twitter.
- Request the Elevated access from https://developer.twitter.com/en/portal/products/elevated. Click Apply for Elevated and complete the form as follow: In the first area In your words and in Will your app use Tweet, Retweet, Like, Follow, or Direct Message functionality? enter I need access to the Account Activity API to start receiving Twitter Direct Messages to my chat software(Zotly) and to reply to them directly from Zotly. Disable all the other fields by clicking No: Are you planning to analyze Twitter data?, Do you plan to display Tweets or aggregate data about Twitter content outside Twitter?, Will your product, service, or analysis make Twitter content or derived information available to a government entity?
- Wait a few days for Twitter to review and approve the Elevated access, you will receive an email from Twitter.
- Once you have Elevated access, enter the developers dashboard (https://developer.twitter.com/en/portal/dashboard) and from the left menu click Products > Premium > Dev environments and under Account Activity API / Sandbox click Set up dev environment, in Dev environment label enter sb or the same value entered in Settings > Twitter > Synchronization > Dev environment label.
- Enter your app Settings area from Left menu > Projects & Apps > Your project > Your app and under User authentication settings click Set up and activate OAuth 1.0a. In App permissions check Read and write and Direct message, in Callback URI / Redirect URL enter the URL you get from Zotly > Settings > Twitter > Get callback URL, in Website URL enter your website URL.
- Enter your app Keys and tokens area from Left menu > Projects & Apps > Your project > Your app > Keys and tokens and under Authentication Tokens generate Access Token and Secret, copy and paste them in Zotly > Settings > Twitter.
- Enter your Twitter profile username in Zotly > Settings > Twitter > Your username. Get it from your Twitter profile page, copy the name starting with @ or the URL part containing your username. Ex. https://twitter.com/zotly.
- Save the Zotly settings and click the button Zotly > Settings > Twitter > Subscribe and you’re done. All messages sent to your Twitter account will be received by Zotly.
More information
- If you receive duplicate messages, the Twitter account you are using for testing may be the same as the one you synced. Try sending a message from another Twitter account.
- Use a live domain.
- When a message is received from a Twitter user you may send up to 5 messages in response within a 24 hour window. No messages can be sent after 24 hours of receiving the Twitter message.
- You can send maximum 3 or 4 attachments depending by the media type.
- The following Zotly rich messages are not supported: images slider, slider, card.
- The chatbot is supported. The human takeover feature is supported.
- The supported AI features include language detetction, spelling correction, multilingual via translation, Google search.
#Zendesk
The settings below are related to the Zendesk App.
Installation
- From Settings > Apps, click Zendesk click Active.
- Get the domain from the URL of your Zendesk admin area, copy the first part of the URL: https://domain.zendesk.com/. For example, the domain of https://zotly.com/tickets/url/abc is Zotly.
- Get the API key from Left menu > Admin > Channels > API > Settings. Click Add API token.
- The email is your Zendesk account email.
More information
- Tickets converted by Zotly are automatically synchronized when new messages are sent and received in Zotly , and they are linked to an existing Zendesk user if any, otherwise a new Zendesk user is created.
- Zotly links Zendesk users to Zotly users via email or phone number.
Credits
Credits are used by the following functions, only in Automatic sync mode. The Manual sync mode doesn’t use credits. If you do not want to use credits, you can use the Manual sync mode and your own API keys.
- Artificial Intelligence > OpenAI > Chatbot and Spelling correction, Message rewrite button, Speech recognition.
You can change the sync mode at any time from Settings > Artificial Intelligence > OpenAI > Sync mode or Settings > Artificial Intelligence > Google > Sync mode.